Wednesday, September 28, 2011

BAGELS

I don't know if I've mentioned this before, but I love carbs. I crave them. It's really sad and disgusting because I know that when my metabolism starts slowing down in a few years, I will have to cut back. In a huge way. But I guess until then, I can indulge. You're only young once, right?! Right. Anyways! My boyfriend sent this bagel recipe to me about a year or so ago, but I only started experimenting with it this summer. He's usually a health freak* about eating out and eating lots of store-bought carbs, but he fully supports me if I bake them myself. So seriously, I don't know why I didn't start doing this earlier. Another thing that really pushed me towards baking my own bagels was bagel spice. I tried it on fried dippy eggs this year and since then, I have been thinking about actually using them on real bagels. So since I started experimenting with the recipe this summer, something I learned was that those little bottles of bagel spice get used up in basically one batch. So logically, I went and bought a 5 lb. bag of it. Yes, you can buy 5 lbs of spice. You're very welcome for that tidbit of information. So here is the recipe: Bagels. And here are some pictures:


One thing I do need to improve: my roll technique. My bagels turned out really lopsided. Luckily they taste awesome. No, I did not make bagels and immediately consume one.**
Also, I would like to point out that although the recipe at no time says explicitly to "cover" the bagels while they are resting, it is necessary for proper rise and retaining moisture! This is probably intuitive to most people, but I am a rookie at bread baking.

* I mean this in the most loving way possible. Isn't he so sweet to look after my health?!
** I lied.
Monday, September 26, 2011

Dumb Idea

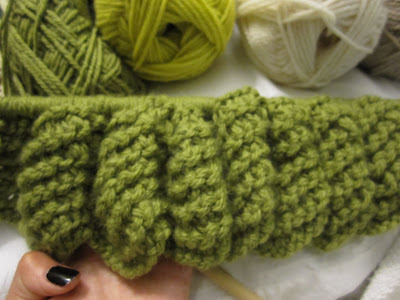
Fall is here! I am craving that itty bitty chill in the air that requires me to don a wooly sweater. I'm not really getting it in Baltimore right now, but since school is in session, I feel like I never go outside anyways except to go from apartment to chemistry building to food to chemistry building and back to my apartment. So I'll probably miss any subtle weather changes anyways, and by the time I realize it's getting chilly it will be EFFING COLD. That happens every year. So of course I am in the mood for knitting big stupid projects that I will never finish because I have to do Science instead. Here is my latest dumb venture:


A chevron blanket! I was inspired by the beautiful colors of the baby blanket I saw on The Purl Bee. I am really really in love with that gorgeous light lime green right now. I can't explain why. It's just speaking to me. I modified the thing by casting on 114 stitches instead of 100 and I am of course doubling my wool. I am hoping for some instant gratification once I actually get around to knitting. Also, I have my first big exam in grad school tomorrow. This is the main reason why I haven't touched this project since last weekend.

Sunday, September 11, 2011

Pumpkin Scones.


I've been craving pumpkin SO BADLY recently and one of the things that I hadn't (until now, of course) attempted to make from scratch is scones! So I found a good lookin recipe on the interwebs from Sweet Peas Kitchen. and I modified it so I could add a bit more pumpkin (2/3 of a cup instead of 1/2). Unfortunately, I didn't realize how much more wet that would make them, so I ended up adding about a cup more flour! Which totally sucked, because even though my scones still tasted a little bit like pumpkin, they were drier than I would've liked and were more yellow than orange. Not festive at all, although still delicious!

Then I decided that experimentation was necessary. I still wanted 2/3 cup pumpkin, because I wanted a high concentration of pumpkin. So, using that same recipe, I substituted 1 cup white whole wheat flour for 1 of the all-purpose cups (because whole wheat is supposedly drier), and kept my 2/3 cup pumpkin ratio. I still needed to compensate a little for the wetness in the dough (+another 1/3-1/2 cups all-purpose flour), but I decided I gave less of a crap about how wet it was because i floured EVERYTHING. Which I think is the key. So tada! More orange, more pumpkin-ish scones! PLUS part whole wheat! Yay! Anything to justify an addiction to sugary carbs! These pictures are the result of the second experiment.


My only other modification to the recipe (both times), is the freezer thing. My freezer (and refridgerator, for that matter) right now is laughably small, so chilling my dough is totally out of the question.

Saturday, September 10, 2011

Migas


Breakfast today: migas!

Fried flour tortillas
Eggs
Cheese
Homemade guac
Non-homemade salsa

My mom is from San Antonio, Texas, and making this always reminds me of her.


Monday, September 5, 2011

Story Time

Pre-1987 - My dad is living in West Philly, practically rent-free because his apt owner, Doug, is redo-ing the house for his wife. She-who-must-not-be-named and Doug divorce. Doug rids himself of all furniture that the dark lord liked (ie carries it upstairs and tells my dad to take it, or else). Dining room table plus chairs now in my dad's possession.
1987 - My parents are married.
1989 - My parents move to the suburbs, bringing all furniture with them. I am born. Chairs reupholstered sometime before I turn 3 years old (aka before I remember).
1990 something- My parents buy a new dining room table and chairs and the old set is moved into our playroom.
2007 - My brother converts playroom into music studio. Table and chairs are his new desk.
Now - I move to grad school, my brother INSISTS I take the dingy old table and chairs. I am inspired to reupholster.

I seriously suck at furniture "before" pictures. Just like I suck at food "after" pictures. This is the old fabric. It didn't look half bad on those chairs 20 years ago. Pleather plus mustard yellow were still "in"-ish.


Materials: Scissors, Outdoor Canvas (doubled), Furniture nails, quilt batting (doubled), mallet, screwdriver


Fabric detail:


Yay!


How-To Details:
These are basically different for each piece of furniture. For my chairs, I had to unscrew 4 reinforcements from the bottom of the chair. To this was attached a wooden base that had the (ugly, old) fabric covering it. The base is the first picture. The fabric was only attached by head nails, I suppose because my dad was too lazy to go find a staple gun. Hey, me too! I measured my fabric/quilt batting according to the size of the base, leaving myself between 3-4 inches of the canvas on each side (the batting was exactly covering the base). I recommend 4 inches, but I managed okay with 3 inches in some cases, though it was much more difficult to nail down. I did this hurriedly and not very neatly, as can be seen from the pictures. To make sure your upholstering is neat on the edges, I HIGHLY recommend a staple gun, but I didn't have one on hand, and I prefer my handmade look (I can justify any type of laziness). To finish it up, I screwed the reinforcements back onto the base and VIOLA! I have new-ish chairs.

PS. To give you an idea of how these chairs have aged, when I went to unscrew the reinforcements, I found that some of them were no longer attached to the chair itself, but ONLY screwed into the base of the chair! So I had to glue them back into their places and wait a day before I finished screwing the chair back together. I didn't have wood glue, but apparently Elmer's "Glue-All" functions quite well as a wood glue. Pretty cool!

Thursday, September 1, 2011

Dresser Make-over


Ikea Malm dressers (3-drawer chest = $80 and 4-drawer chest=$100)
+ drawer pulls (16 drawer pulls=$40)*
= $220 grand total

*I found the drawer pulls at Home Goods (a TJMaxx affiliate) in packages of 4 for $10.


I don't have any real "before" pictures. This will have to do:


"After"(-ish):