Wednesday, September 28, 2011

BAGELS

I don't know if I've mentioned this before, but I love carbs. I crave them. It's really sad and disgusting because I know that when my metabolism starts slowing down in a few years, I will have to cut back. In a huge way. But I guess until then, I can indulge. You're only young once, right?! Right. Anyways! My boyfriend sent this bagel recipe to me about a year or so ago, but I only started experimenting with it this summer. He's usually a health freak* about eating out and eating lots of store-bought carbs, but he fully supports me if I bake them myself. So seriously, I don't know why I didn't start doing this earlier. Another thing that really pushed me towards baking my own bagels was bagel spice. I tried it on fried dippy eggs this year and since then, I have been thinking about actually using them on real bagels. So since I started experimenting with the recipe this summer, something I learned was that those little bottles of bagel spice get used up in basically one batch. So logically, I went and bought a 5 lb. bag of it. Yes, you can buy 5 lbs of spice. You're very welcome for that tidbit of information. So here is the recipe: Bagels. And here are some pictures:


One thing I do need to improve: my roll technique. My bagels turned out really lopsided. Luckily they taste awesome. No, I did not make bagels and immediately consume one.**
Also, I would like to point out that although the recipe at no time says explicitly to "cover" the bagels while they are resting, it is necessary for proper rise and retaining moisture! This is probably intuitive to most people, but I am a rookie at bread baking.

* I mean this in the most loving way possible. Isn't he so sweet to look after my health?!
** I lied.
Monday, September 26, 2011

Dumb Idea

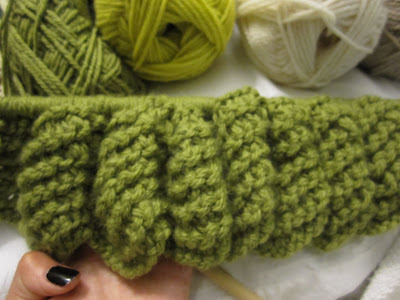
Fall is here! I am craving that itty bitty chill in the air that requires me to don a wooly sweater. I'm not really getting it in Baltimore right now, but since school is in session, I feel like I never go outside anyways except to go from apartment to chemistry building to food to chemistry building and back to my apartment. So I'll probably miss any subtle weather changes anyways, and by the time I realize it's getting chilly it will be EFFING COLD. That happens every year. So of course I am in the mood for knitting big stupid projects that I will never finish because I have to do Science instead. Here is my latest dumb venture:


A chevron blanket! I was inspired by the beautiful colors of the baby blanket I saw on The Purl Bee. I am really really in love with that gorgeous light lime green right now. I can't explain why. It's just speaking to me. I modified the thing by casting on 114 stitches instead of 100 and I am of course doubling my wool. I am hoping for some instant gratification once I actually get around to knitting. Also, I have my first big exam in grad school tomorrow. This is the main reason why I haven't touched this project since last weekend.

Sunday, September 11, 2011

Pumpkin Scones.


I've been craving pumpkin SO BADLY recently and one of the things that I hadn't (until now, of course) attempted to make from scratch is scones! So I found a good lookin recipe on the interwebs from Sweet Peas Kitchen. and I modified it so I could add a bit more pumpkin (2/3 of a cup instead of 1/2). Unfortunately, I didn't realize how much more wet that would make them, so I ended up adding about a cup more flour! Which totally sucked, because even though my scones still tasted a little bit like pumpkin, they were drier than I would've liked and were more yellow than orange. Not festive at all, although still delicious!

Then I decided that experimentation was necessary. I still wanted 2/3 cup pumpkin, because I wanted a high concentration of pumpkin. So, using that same recipe, I substituted 1 cup white whole wheat flour for 1 of the all-purpose cups (because whole wheat is supposedly drier), and kept my 2/3 cup pumpkin ratio. I still needed to compensate a little for the wetness in the dough (+another 1/3-1/2 cups all-purpose flour), but I decided I gave less of a crap about how wet it was because i floured EVERYTHING. Which I think is the key. So tada! More orange, more pumpkin-ish scones! PLUS part whole wheat! Yay! Anything to justify an addiction to sugary carbs! These pictures are the result of the second experiment.


My only other modification to the recipe (both times), is the freezer thing. My freezer (and refridgerator, for that matter) right now is laughably small, so chilling my dough is totally out of the question.

Saturday, September 10, 2011

Migas


Breakfast today: migas!

Fried flour tortillas
Eggs
Cheese
Homemade guac
Non-homemade salsa

My mom is from San Antonio, Texas, and making this always reminds me of her.


Monday, September 5, 2011

Story Time

Pre-1987 - My dad is living in West Philly, practically rent-free because his apt owner, Doug, is redo-ing the house for his wife. She-who-must-not-be-named and Doug divorce. Doug rids himself of all furniture that the dark lord liked (ie carries it upstairs and tells my dad to take it, or else). Dining room table plus chairs now in my dad's possession.
1987 - My parents are married.
1989 - My parents move to the suburbs, bringing all furniture with them. I am born. Chairs reupholstered sometime before I turn 3 years old (aka before I remember).
1990 something- My parents buy a new dining room table and chairs and the old set is moved into our playroom.
2007 - My brother converts playroom into music studio. Table and chairs are his new desk.
Now - I move to grad school, my brother INSISTS I take the dingy old table and chairs. I am inspired to reupholster.

I seriously suck at furniture "before" pictures. Just like I suck at food "after" pictures. This is the old fabric. It didn't look half bad on those chairs 20 years ago. Pleather plus mustard yellow were still "in"-ish.


Materials: Scissors, Outdoor Canvas (doubled), Furniture nails, quilt batting (doubled), mallet, screwdriver


Fabric detail:


Yay!


How-To Details:
These are basically different for each piece of furniture. For my chairs, I had to unscrew 4 reinforcements from the bottom of the chair. To this was attached a wooden base that had the (ugly, old) fabric covering it. The base is the first picture. The fabric was only attached by head nails, I suppose because my dad was too lazy to go find a staple gun. Hey, me too! I measured my fabric/quilt batting according to the size of the base, leaving myself between 3-4 inches of the canvas on each side (the batting was exactly covering the base). I recommend 4 inches, but I managed okay with 3 inches in some cases, though it was much more difficult to nail down. I did this hurriedly and not very neatly, as can be seen from the pictures. To make sure your upholstering is neat on the edges, I HIGHLY recommend a staple gun, but I didn't have one on hand, and I prefer my handmade look (I can justify any type of laziness). To finish it up, I screwed the reinforcements back onto the base and VIOLA! I have new-ish chairs.

PS. To give you an idea of how these chairs have aged, when I went to unscrew the reinforcements, I found that some of them were no longer attached to the chair itself, but ONLY screwed into the base of the chair! So I had to glue them back into their places and wait a day before I finished screwing the chair back together. I didn't have wood glue, but apparently Elmer's "Glue-All" functions quite well as a wood glue. Pretty cool!

Thursday, September 1, 2011

Dresser Make-over


Ikea Malm dressers (3-drawer chest = $80 and 4-drawer chest=$100)
+ drawer pulls (16 drawer pulls=$40)*
= $220 grand total

*I found the drawer pulls at Home Goods (a TJMaxx affiliate) in packages of 4 for $10.


I don't have any real "before" pictures. This will have to do:


"After"(-ish):


Tuesday, August 30, 2011

Crochet Earrings.

I wish I knew/remembered the pattern I used. This is why I need to blog immediately after I make something. Unfortunately that would probably result in a frequency of about 2.0 times a day in the summer and an average of 0.0000001 times per day between the months of September and May. Gotta spread it out. Anyways! On to the pics.


I'd show you a picture of them ON me, but they turned out crappy. Also, here's a picture of my dinner! I'm very proud of it. I made the sauce and dough/crust from scratch. The recipes are here and here, respectively. I modified the crust by using sugar instead of honey in a 1.25:1.0 ratio with 0.25*1 tablespoon of extra water. For the sauce, I used one 16.5 oz. can of Hunt's diced tomatoes and one 16.5 oz. can of Hunt's sauce instead of 28 oz of diced tomatoes. Also, instead of ONE WHOLE TABLESPOON of red pepper flakes, I only threw in a few. I prefer to not set my mouth on fire while trying to enjoy my pizza. But that's just me.


Can you tell I live in Baltimore? (Natty Bo!)

Monday, August 29, 2011

DIY 2.0

Finally, FINALLY, my next project in my Things I Accomplished: Summer 2011 Edition is here. I saw a couple tutorials this summer on blogs such as Tea Rose Home that consisted of taking cheap picture frames, spray painting/decorating them, and then "framing" cork board to create a personalized bulletin board. Since seeing these types of projects... EVERYWHERE... I soon became obsessed with trying it myself. I like cheap pretty things and I absolutely love a nice make-over project (obviously). So, I rummaged through my nearest Goodwill and found these lovelies (EDIT: Mirror was $2 and Frame was $4):


Using these tools: masking tape, rustoleum spray paint, scissors, plastic bag, windex, a wood file, vinegar, mallet, and chisel.

Obligatory "Materials" Photo:


So the chisel, mallet, vinegar, and wood file are not pictured because I realized a little late that I HATED the pinecones on the mirror. I decided that I would try to be scientific/careful about removing them, so that is why I needed so much stuff. Experimentation. So after I tried filing down the pinecones, I realized that they were resin and attached to the frame with wood glue. I read somewhere that wood glue can be removed with acetic acid aka vinegar, so I covered the nasty things with a paper towel soaked in vinegar. After about fifteen minutes, I used the mallet and chisel to wedge the frame and pinecones (I keep wanting to call them acorns. Weird!) apart. That worked beautifully. The wood file was actually a really stupid idea. Yeah. So don't do that.

Obligatory "In-Process" Photo (don't mind my nasty feet):


AAAAAAAAAND the finished products!
A mirror:


A picture frame! Into which I actually have installed some cork board but I don't have any pictures of it.


Phew! Until next time!

Saturday, August 27, 2011

"Tomorrow"

Ha! So that didn't happen. Family vacation was less boring than I thought it would be, and then I moved from home to school only 2 days later! As soon as I can find a way to upload and store all the pictures I took of the projects I was working on slash finished, they will be blogged about.

Tuesday, August 9, 2011

Cheap S***

I have been redoing/DIY-ing/painting stuff like crazy! I have been living with my parents the past couple months since I graduated from undergrad, but I FINALLY move into a new apartment in a week for grad school. Cons of living with my parents: Living with my parents. Pros: Power tool usage! Also acceptable places to spray paint. Unfortunately, people frown upon spray painting inside your apartment rental. I have no idea why.

I know these projects are not really THAT exciting because they are simplistic and easy to do. Each project only took me an afternoon. But the results were so fantastic, I figured I'd post them for the record. I will do it in three posts because living with my parents also means slow internet and upload speeds. Blech.

The most boring project first. I bought this wire rack at Goodwill 2 years ago for 5 dollars. I've been using it, but I figured it needed a new look. I rinsed it with water, sanded it, rinsed it again, and then used black spray paint. I didn't used primer or any sort of sealant.

Before


After


It took 10 stinking minutes for these two pictures to upload. I feel like it's 2007 and I'm using myspace. (Note: I never had a myspace, and this is probably why.) Til tomorrow!

Sunday, August 7, 2011

Ellipsus.

Because I took a long hiatus. Now I am back! And to kick it off, here is THE BEST sugar cookie recipe I have ever made. I have attempted sugar cookies from various recipes all over the net, with results ranging from disastrous to simply "ok" and even then they were sometimes irreproducible(?!). But, finally, FINALLY, I have found the perfect one.


Just make sure your butter is completely softened (I nuke mine in the microwave) and that you roll them in sugar before baking. That is all. Peace out!

Sunday, February 6, 2011

Sniper Mittens aka Trigger Finger Mittens aka Cycling Mitts

My boyfriend claims I made two left hands. I don't believe him. I can't tell how close the color here is to the real deal but IRL they are the color of Mike Wazowski from Monsters Inc.


Project Deets: Pattern from here. I made these a couple years ago, so I really don't remember much about them. I know that the yarn is some Elsebeth Lavold angora stuff and that I used size 4 dpns. Or maybe they were 6's?? AH! Don't listen to me. My boyfriend still wears them, if that means anything at all.

I've been making a ton of mittens lately and I'm bored with it! I kinda just feel like casting on for a GINORMOUS cream scarf/cowl with huge gauge. It's really inconvenient that the boredom with mittens struck while I have 45% of a pair finished. Is anyone interested in paying me for some red mittens with white hearts on them? I think money would motivate me.

In other news, my boyfriend's little sister is learning how to knit and she just texted me that she's making headbands and trying to teach her cousin! I indirectly birthed a new knitter! Almost! She's googling youtube videos about casting on as I write this :]

Friday, February 4, 2011

Boisenberry Almond Thumbprint Cookies

These were the most delicious cookies I've ever made, excluding my snickerdoodles. They are a delicious shortbread cookie with some boisenberry jam (original recipe used raspberry, but I felt like getting fiesty with it) in the middle drizzled with an almond glaze. Mmm getting hungry. Recipe is here. It's relatively easy if you have a mixer!

Tuesday, February 1, 2011

Christmas Knitting (Super Belated)

I knit presents for everyone in my family this year except my brother. Last year I gave him a hat and he didn't wear it because he said people made fun of him! WTF? In his defense, it wasn't handknitted by me... but it was still a knit hat! The boy gots no respect. So no handknits for him. Anyways on to the knits!

Mittens for my mama:
These are the Easy Mittens by Sue Dial in 101 One Skein Wonders. I have made these a million times. I would add it to my ravelry, but I'm almost embarrassed at how many times I have made these mittens. There are two listed projects... but trust me. It's been way more. So this is my go-to mitten pattern as of late. Instead of the rolled cuff, I made a garter stitch cuff (p1 row, k1 row in the round) and doubled up Rowan Kid Classic on size 7 dpns.

Merry Christmas to Me!
Judge me. I don't care. Just kidding! It's pretty! But I didn't give this to anyone because it fits kinda funny. I didn't account for the fact that stranded knitting makes for a tighter fit when you're an amateur like myself. So the brim is really loose compared to the actual head part. Woops! Stats: Cascade 220 in grey, Patons Classic Wool in gold, and some Ella Rae wool that I have no clue what to do with otherwise on 16" size 6 circs. The pattern is From Norway With Love by Anna and Heidi Pickles. I made a ravelry page for this but it says the same stuff.

I also made my dad a hat, a Natural Winter Kit hat, but I didn't get a chance to photograph it before I had to wrap it. And then give it. It was a boring color anyways. Tata!

Monday, January 24, 2011

I'm here to word/knit vomit all over the blahgosphere


I'm not that great a writer, so I had a bit of anxiety about starting a blog, but then I realized: it's the internet! People say whatever they want; surely I can post about what I knit/want to knit/eat/want to eat! I know, I have a really interesting life. So here I am. Starting over, cause I'd really like to document what I make. Here's a picture that basically sums up what I did over my winter break this past month:


Along with:


My boyfriend's mom had an idea for spicin' up some apple cider: store-bought cider, nutmeg, allspice, apple slices, orange slices, and a cinnamon stick! Warm that stuff up on the stove (don't let it boil), ladle it into a mug, and you have the perfect whiskey mixer! Actually, the whiskey part was my idea. Yum!